

For as long as I’ve been writing about the Internet, I’ve been advising my readers to buy their own modem and router. It’s one of the easiest ways to save money on the Internet – a small initial investment that usually pays for itself within a year. My dirty secret? I rent my router from Xfinity all the time.
Most ISPs charge between $10 and $15 a month for the equipment, while you can generally get a modem and router for less than $200. Buying your own internet equipment usually pays for itself in the first year, but often comes with additional hassles.
All this time, I was paying $10 to $15 extra for the privilege of using Xfinity’s modem and router gateway device. (Xfinity seems to raise the prices of the devices by a dollar or two every year.) For the most part, that was fine with me — my internet bill is reasonable, and I was OK with paying a little more for the convenience. But after looking through my old bills, I came up with a number that made me rethink things: $873. That’s how much I’ve spent on Xfinity’s device fees over the years.
With the money I spent renting Xfinity equipment, I could have bought the most advanced router CNET has ever tested, and then another as a backup. I could have doubled my internet speed. I could have booked a flight to Oslo.

As happy as I am with my service, owning your own equipment is almost always the better option. You often get better performance – my upload speeds have increased by more than 2,000% – and like I said, it usually pays for itself within the first year or two.
You might be perfectly happy paying a little more to avoid having to buy and set up equipment yourself, but if you want to save money in the long run and are comfortable buying and managing your own equipment, it’s far more cost-effective to pay for your own router and modem.
Here’s what I learned about switching from rented equipment to my own, and how you can make a similar transition as painless as possible.
How to choose the right modem and router
The best internet is the internet you never notice, and I can’t remember the last time my connection dropped or I saw a buffering wheel in my home, all with a 2017 device that Xfinity describes as an “old wireless gateway with limited speed and functionality.”
This shows how the type of internet user is closely related to the type of equipment needed. I live in a 70 square meter apartment and my internet needs are mostly limited to video calls and TV streaming. If you live in a larger house with multiple floors, the same router probably won’t be enough. Likewise, activities like online gaming depend on split-second responses. If that instant responsiveness is important to you, it’s probably worth investing in a gaming router that minimizes lag.
Wi-Fi routers range from entry-level models like the TP-Link AC1200 for $31 to ultra-modern mesh systems such as the Netgear Orbi 970 series for 1,700 US dollars. To test each Wi-Fi router, CNET runs three speed tests in five different rooms in our testing facility and logs the results for download speed, upload speed and latency. This process is repeated six times to account for variations in network performance at different times of the day.
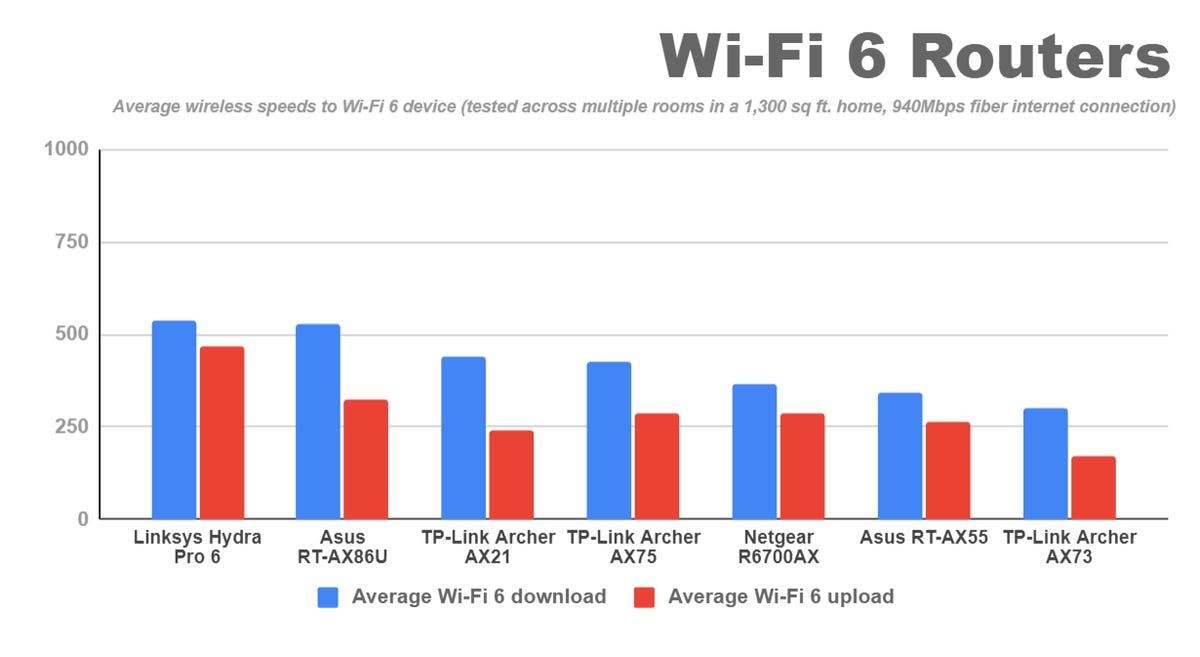
After consulting our selection of the best WiFi routers, I decided on our budget choice: the TP-Link Archer AX21about which my colleague and router expert Ry Crist wrote, “It’s nothing special, but in our testing it performed nearly flawlessly for small to medium-sized homes, and setting it up is a breeze.” I only get 200Mbps on my Xfinity plan, so the 700Mbps the TP-Link gets from close range is more than enough juice, and it only costs $75.
Do you need to buy a modem?
Depending on what type of internet you use, you may need to purchase a cable modem in addition to your router. Some ISPs, like Spectrum, offer the modem for free but charge extra for a router.
The most important thing to look for in a modem is compatibility. Your ISP will have a page on its website with a list of all the models it’s compatible with, and you shouldn’t let that dissuade you. You may also have a choice between DOCSIS 3.0 and 3.1; the newer standard offers faster speeds, but DOCSIS 3.1 modems tend to be more expensive. Other things to consider are the modem’s speed limits – make sure they’re the same or higher than your internet plan – and the number of Ethernet ports.
Xfinity does not provide a free modem, so I had to buy one in addition to a wireless router. I opted for the Hitron CODA Modem – a DOCSIS 3.1 model that’s one of the cheapest Xfinity-compatible models I could find for $100. It supports download speeds of only up to 867 Mbps, but that’s still way more than my Xfinity plan.
How to set up your new modem and router
Ordering the equipment is the easy part; the ordeal of setting up third-party equipment keeps many customers on their toes for years. The process is largely the same whether you’re restarting service with a new provider or replacing old equipment. Here’s everything you need to do.
1. Activate your new modem with your ISP
The modem is the device that brings the Internet into your home via a coaxial cable connected to your ISP’s network. In order for it to work, ISPs need to link your particular modem to your account. When you replace old equipment, they also turn it off when they activate the new modem. ISPs do this by logging your MAC (Media Access Control) number, which is located on the bottom of the modem.
You can usually do this through your internet provider’s app, live chat, or by calling a customer service number.
2. Connect the coaxial cable to your modem
After your new modem’s MAC address is registered with your ISP, you will be prompted to connect your modem to the cable jack in your wall and plug it into an electrical outlet. You may need to wait up to 5 minutes and your modem’s lights will tell you when it is receiving the Internet signal. Once the lights are lit, you can set up your wireless router.
3. Set up your WiFi router
Each wireless router has its own setup process, so you should follow the instructions provided. In the case of the TP-Link Archer AX21, this meant unplugging the modem from the power supply and connecting the modem via a Ethernet cableI turn on the modem and then plug the router into a power outlet. From there I set up my new network using the TP-Link app.
That’s the short version. There’s a lot more to consider when setting up a wireless router, including choosing the best location, setting up parental controls, and protecting your privacy. But for my purposes, I was ready to test out my new internet connection.
Speed comparison: Which setup is the fastest?
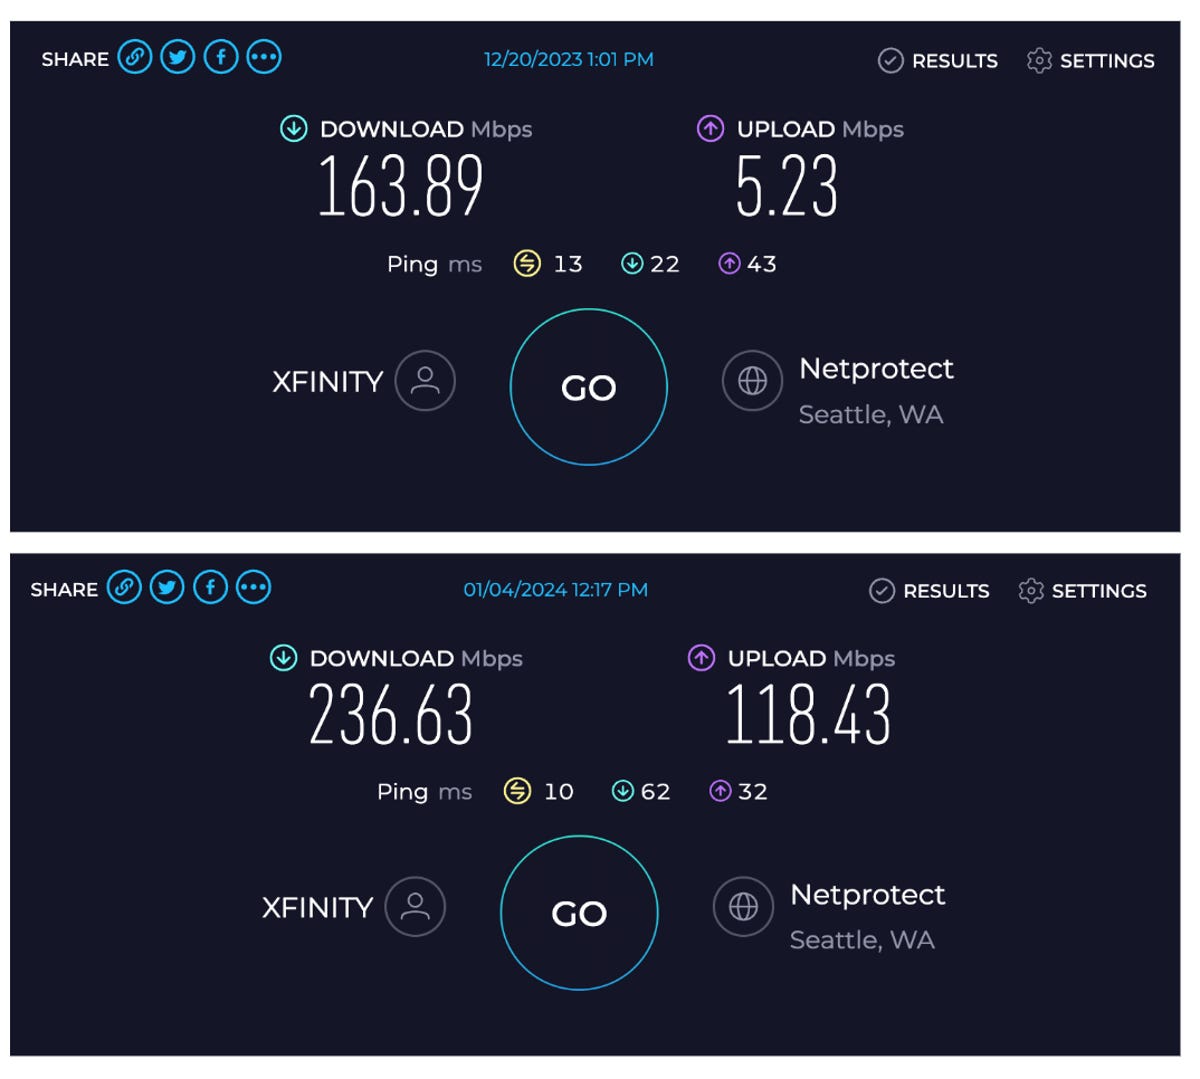
I wanted to see how my new modem and router compared to my old equipment, so I ran speed tests before and after connecting: one from my desk next to the router and one from the farthest corner of my apartment (the bathroom, unfortunately).
My old modem and router delivered speeds of 164/5 Mbps from my desk and 143/5 Mbps from the bathroom—not bad for an internet plan that promises speeds of 200/10 Mbps. But the speeds with my new gear were staggering: 237/118 Mbps at both my desk and my bathroom. Not only did I save money by buying my own gear—I actually got a significant speed boost.
I have no idea why my new gear has 10 times the upload speed of my old one. I’m subscribed to Xfinity’s Connect More plan, which is supposed to only offer 10 Mbps upload speeds. In 2022, Xfinity announced it would increase my plan’s upload speed to 100 Mbps – but only for customers who pay for the xFi Complete gear at $25 per month. It seems I’m getting the same benefits with my new modem and router. I suspect upgrading from a DOCSIS 3.0 to a 3.1 modem is the main reason for the increase in upload speeds.
How to save yourself a headache
I finally got my modem and router set up correctly, but I made a lot of mistakes. Here’s what I would do differently:
- Buy your modem and router on day one. Moving is a hassle and no one wants to add to their to-do list, but this is a task that’s worth the extra effort (almost a thousand dollars in my case). You may need to have a technician come to your home to set up your internet, so it makes sense to have your modem and router ready to go in case there are any problems.
- Use your ISP’s list of compatible modems. Routers aren’t tied to any particular vendor, but if you have to buy your own modem, you’ll need to make sure it works with your ISP. Don’t compromise on this. I looked on Amazon for a modem that claimed to be compatible with Xfinity, and had to return it a week — and several hours of phone calls — later. Your provider should have a page that lists all the modems it works with — don’t deviate from it.
- Pay only for the speed you need. Internet equipment is expensive, and there’s no reason to pay for a modem certified for 2,000Mbps when your plan only offers 200Mbps. The same goes for routers – you don’t need to pay top dollar for a gaming router with exceptional latency if all you use is TV streaming and the internet.
The conclusion
Setting up a new modem and router isn’t fun, but is it worth it? Absolutely. Not only are my internet speeds dramatically improved, but I’m paying significantly less for it. I’m saving $15 a month on the equipment, and at one point an Xfinity employee dropped the price of my plan for the next year. My monthly bill drops from $78.54 to $50. That’s way more than I expected to save, and my new equipment will pay for itself within the first six months. My only regret is not making the leap sooner.
